How to Set Up Your WordPress Menus (In 3 Steps)
In this tutorial, we are going to discuss the importance of WordPress menus and how they affect your user experience. Then we’ll explain how to set them up in three steps.
Your WordPress menus are important elements that will also contain other primary areas of your website. They provide the fastest way for your readers to find your content and navigate your site. Consequently, using poorly organized or unwieldy menus can be detrimental to your user experience and, in turn, damage your search engine rankings.
Fortunately, WordPress includes a menu editing system that’s easy for all users to grasp. The location can vary depending on your theme, although most WordPress themes include least one menu location.
An Introduction to WordPress Menus (And Why You Need Them)

Menus are navigational tools that enable your users to find content throughout your site. This makes them essential to your site’s overall organization and user experience.
For example, if a reader discovers your site through a search engine, they may not always land on your home page. To learn more about your site from the page they landed on, they will need to know how to explore your other content. Out of habit, they will look for your menus to get a feel for what else there is to explore.
Just as importantly, the correct use of WordPress menus can improve your site’s Search Engine Optimization (SEO). Search engines reward relevant content so making sure your menus are clear about the content contained within them will increase your rankings. There are a few other ways that menus can improve your SEO, such as:
- Improved user experience: If your readers have a pleasant user experience, they are likely to spend more time on your site. This means lower bounce rates for you.
- Sitelinks for Search Engine Results Pages (SERPS): The results page of a search engine will display the main page and links to internal pages if the site and its navigation are well organized.
- Easier crawling by search engines: Search engines use bots to crawl through your site and discover its pages in order to index your content. Having well-organized navigation that clearly shows what content is available for each menu topic makes it easier for bots to find and index your content.
When it comes to WordPress menus, the key is to have them in a prominent location and well organized. While the perks of better SEO are awesome, menus also make it easy for your readers to find the content you’ve crafted for them.
How to Set Up Your WordPress Menus (In 3 Steps)
The beauty of WordPress is that menus are inherently a part of the platform. Many themes come with predefined menus and locations — and should include at least one of each.
However, it is also important for you to understand the best way to incorporate menus. So we recommend you do a little planning to create a sitemap (or at least a navigational strategy) before you take the next step in creating the menus for your site.
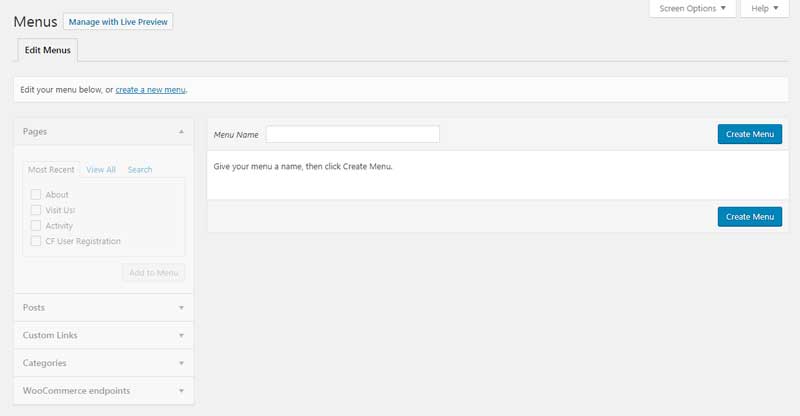
1. Create a New Menu in WordPress
Once you’ve made a navigational plan or sitemap, you’re ready to create your menus. Within WordPress, navigate to the Appearance > Customize screen, then click on Menus.
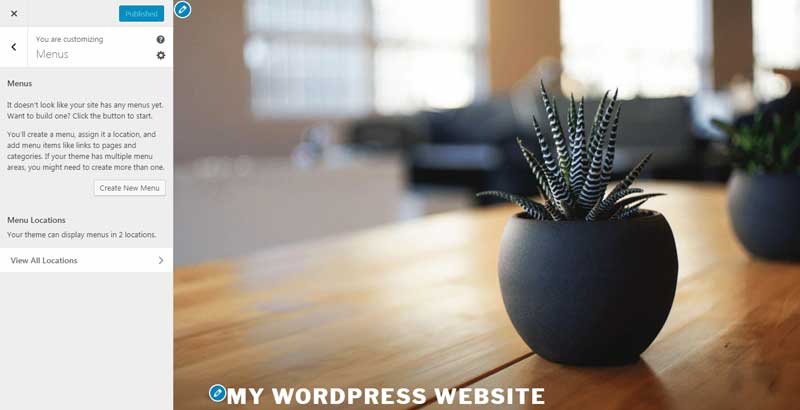
If you don't have a menu set up yet, you can simply select Create New Menu to get started. You'll be given the option to name your menu and choose where it will appear.
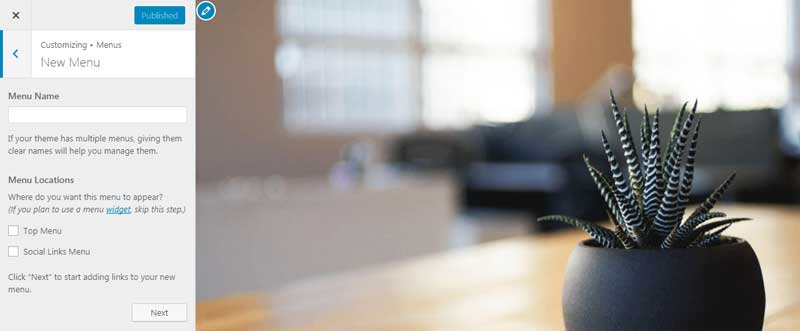
Keep in mind that the potential locations for your menu will vary depending on your theme. When you've made your choices here, click on Next, then select the Add Items button. On the next screen, you'll be presented with all of your site's pages and posts, categories, custom links, and anything else that can be included. Now, it’s time to start building your menu!
2. Add Your Navigation Items
For each new menu you add to WordPress, you’ll be able to include any of your pages, posts, and other content. You’ll see each of your site’s elements separated into various sections, and they’re all selectable. Just click on an item to add it to your menu.
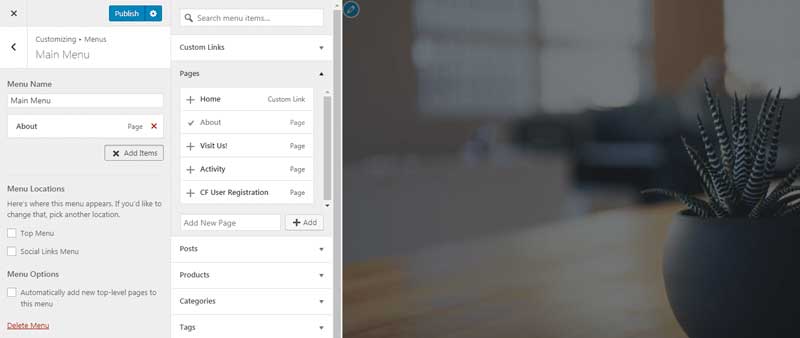
Once selected, you’ll see the item show up in the left-hand column. If you make a mistake, you can select the red Xicon to delete an entry. You can even create new content here and immediately add it to your menu. For example, to add a new page you simply need to type a name for it into the box at the bottom of the Pages section, then select the Add button.
As you include items, you should see them appear on your site in the preview panel. This useful feature lets you see what your menu looks like as you’re building it. Once you’ve selected everything you want to include in your menu, it’s time to start organizing it.
3. Organize Your Menu’s Structure
Next up is arguably the easiest part of setting up your WordPress menus. Organizing your menu items is as simple as dragging and dropping them into place.
To do so, hover over any menu item you’ve added. You’ll see your cursor turn into a crosshair. From here, simply drag and drop the item up or down to reorder it.
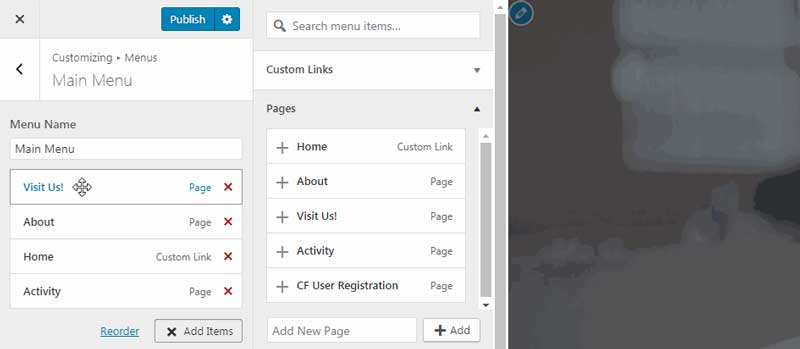
If you’d like to create a menu hierarchy using submenus, you can do that here as well. Just drag an item to the right, and it will automatically become a sub-element of the menu item right above it.
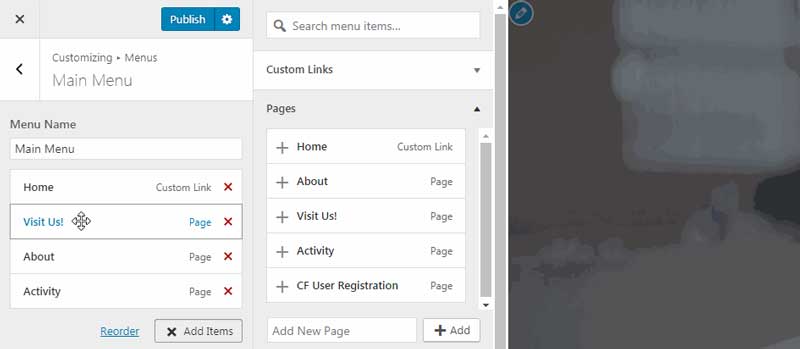
When your ready to move on, click the Publish button at the top of the page to preserve your changes. Alternately, you can select Save Draft or Schedule if you don’t want your new menu implemented quite yet.
The Live Customizer is usually the best way to set up your menus since you can see your changes while you make them. However, it’s worth noting that you can do create menus through a similar process in the Appearance > Menus section of your dashboard.
If you’re good with code, you can also use CSS to change your menus’ placement using hooks and filters. If you go down this route, however, you’ll want to follow your theme’s documentation to avoid issues with your site’s layout.
How to Add Additional Menus Using the WordPress Menu Widget
If you’d like to include additional menus elsewhere on your site (within your sidebar, for example), you can use WordPress’ menu widgets to get the job done. To add menus to these areas, you’ll need to navigate to Appearance > Customize in WordPress once again. This time, you’ll want to visit the Widgets section.

You’ll see a list of preset widget areas, which will vary depending on your theme, but are usually located in your sidebars and/or footer. Choose the area where you want your menu to be placed, and you’ll be presented with a number of widget options.
Look for the one called Navigation Menu. If it isn’t already in place, you can select Add a Widget, search for it, then click to add it to your widget area. Then, expand the widget by clicking on it.
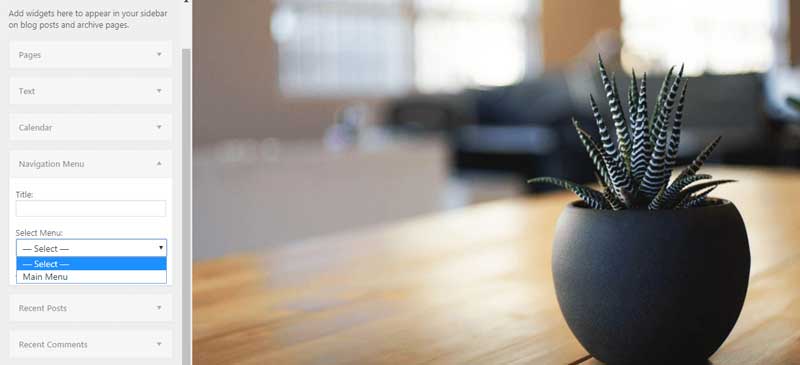
You’ll get the chance to add a title (which is optional), and also select the menu you’d like to display. If you haven’t created any menus yet, you’ll be given the option to do so now. Widgets provide you with yet another way to display menus on your website and will be especially helpful if you’re short of suitable locations within your chosen theme.
Conclusion
When it comes to creating a great user experience, easy-to-follow navigation should be one of your highest priorities. Just as importantly, your search engine rankings also benefit from well-organized content that’s easy for readers to find.