Say Goodbye to Spam! A Complete Guide to reCAPTCHA

In 2013, Target now infamously compromised the data of tens of millions of shoppers in an event that slashed sales, brought lawsuits, and even caused the CEO to resign.
What happened?
Hackers gained access to Target through a third-party vendor that lacked a CAPTCHA or any kind of authentication to ensure there was a human — not a malicious bot — entering their system.
From there, it didn’t take long for the bot to infiltrate this third-party vendor’s organization and work its way into the major retailer’s payment network.
What’s the lesson here?
If bad actors want a way into your website, a CAPTCHA can be a powerful first line of defense, and even convince them to move on to an easier target (pun *highly* intended).
Intrigued by this CAPTCHA concept?
Then read on to learn:
- The difference between CAPTCHA and reCAPTCHA (and what all those letters mean!)
- The core types of CAPTCHAs in use today
- How CAPTCHAs can help website owners avoid spam and abuse
- A few downsides to consider with CAPTCHAs
- Two ways to add a Google reCAPTCHA to your WordPress site
Get Content Delivered Straight to Your Inbox
Subscribe to our blog and receive great content just like this delivered straight to your inbox.
What is reCAPTCHA?
Get ready folks, because this one’s got layers.
Let’s start with a basic definition: “reCAPTCHA is a service from Google that helps protect websites from spam and abuse.”
reCAPTCHA from Google is a popular, branded version of CAPTCHA. The original idea of CAPTCHA was envisioned at Carnegie Mellon University around 2000. reCAPTCHA was also created by developers at the same university, then purchased by Google around 2009.
Now for the next layer: What do all the letters in “CAPTCHA” actually mean?
The phrase CAPTCHA is short(ish) for “completely automated public Turing Test to tell computers and humans apart.”
And that explanation brings us to a final, logical layer to peel back: What’s a Turing Test?
If you’re like us, your primary exposure to the Turing Test comes from the 2014 movie The Imitation Game, featuring mathematician and computer scientist Alan Turing.
Alan Turing developed the Turing Test (which he originally dubbed the imitation game — humble) to answer the question, “Can machines think?”
Today, Turing Tests are primarily used to tell humans and bots apart by testing a bot’s capacity to display the same intelligent behavior a human would. Bots, in this case, refer to automated software programs, often powered by artificial intelligence (AI).
Bot
A bot is a program designed to automate specific tasks. For example, search engines use bots to crawl the web following links to map and index new pages. Bots are also common in malware.
Read MoreCAPTCHAs help prevent spam and abuse on websites by blocking bots with challenges that are relatively easy for us humans to figure out and accomplish, but often expose bots for the programs they are.
Now that you know enough to definitely write a novel on the background of the CAPTCHA, let’s talk about all the different ways we see this concept appear in everyday life.
Different Types of CAPTCHAs
CAPTCHAs have developed in various directions over the years in an attempt to make the distinction between humans and bots. Today, there are several common types of CAPTCHAs which require different forms of reasoning and input.
Text-Based CAPTCHAs
Text-based CAPTCHAs show characters in odd arrangements, using unusual fonts, and on colorful backgrounds.
These CAPTCHAs require reasoning and translation to sort out what each letter and number is meant to be — an intelligent task that many pre-programmed bots can’t do.
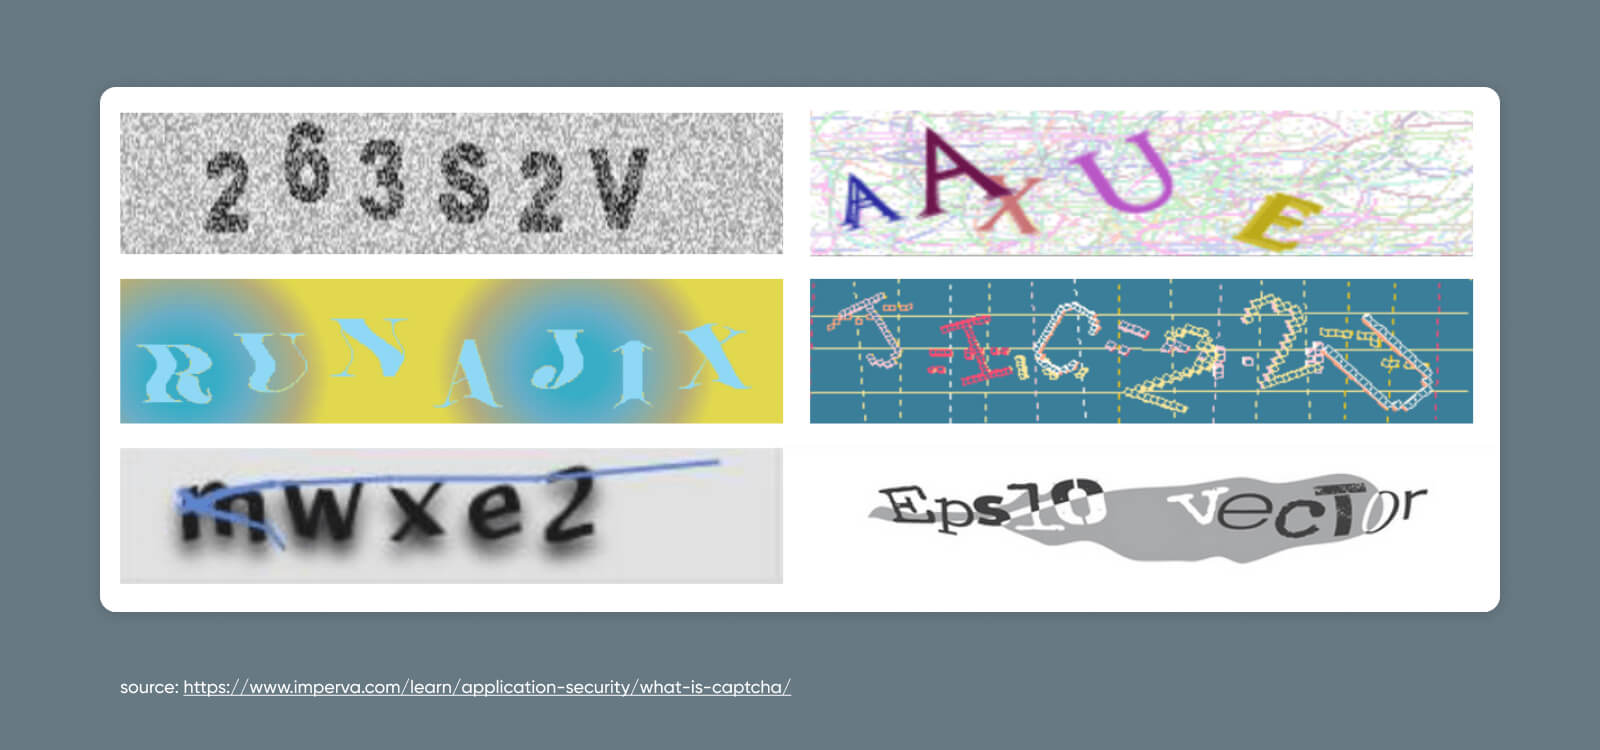
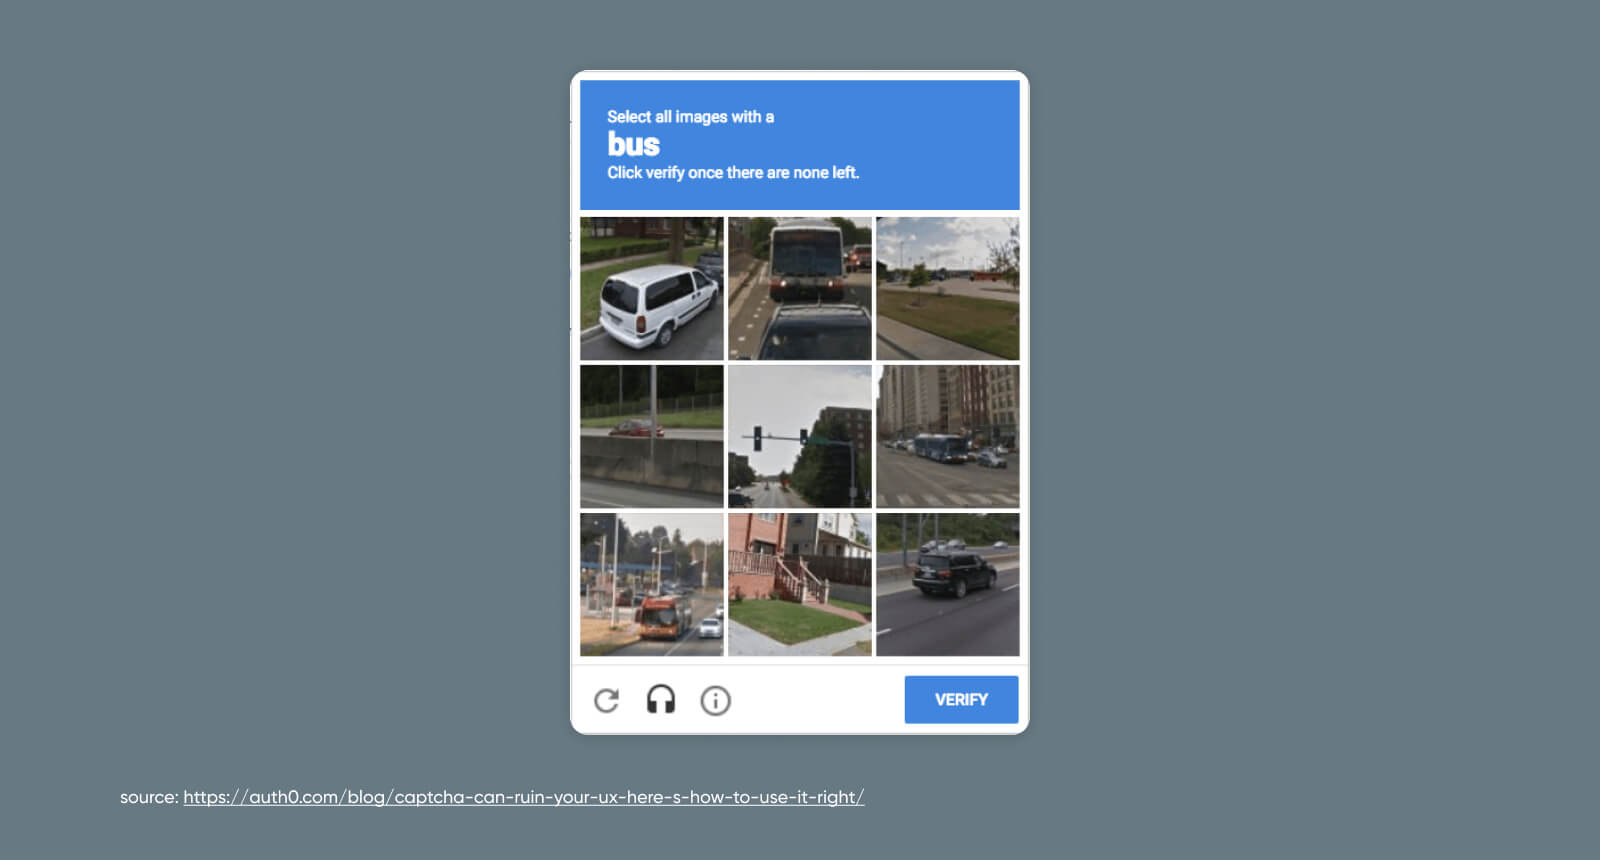
Image-Based CAPTCHAs
With an image-based CAPTCHA, the website user must identify which displayed photos match the provided prompt. By using similar-looking photos that require a level of logic to distinguish, this option can also outsmart bots.
Google’s reCAPTCHA tests use this method quite often — which makes sense considering its vast source of photos from Google Street View.
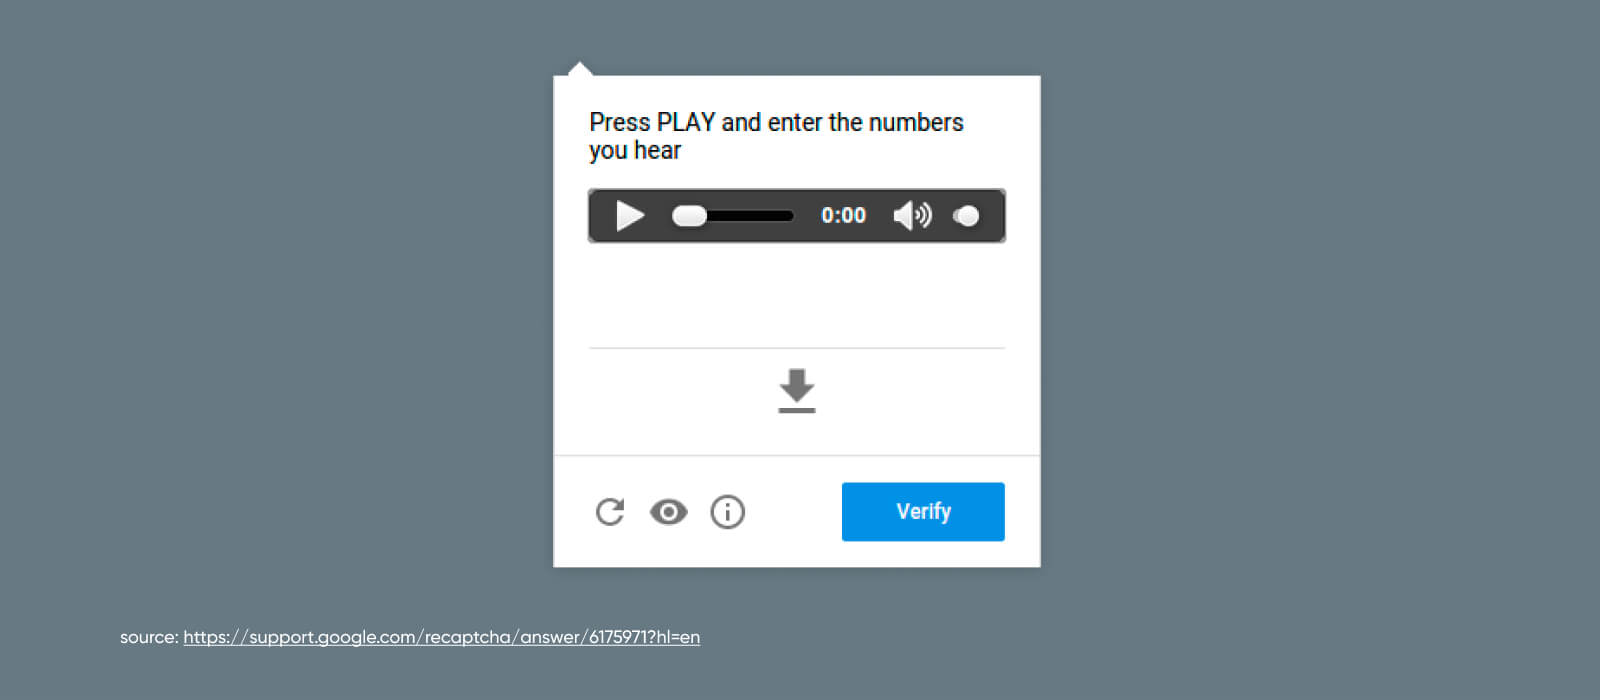
Audio-Based CAPTCHAs
With audio-based CAPTCHAs, sound is the medium. This method is often paired with others, like text and visual CAPTCHAs.
Audio CAPTCHAs are not only more accessible to people with vision impairment – they are also a powerful bot-blocker as they rely on how tricky it can be to distinguish actual words from background noise.
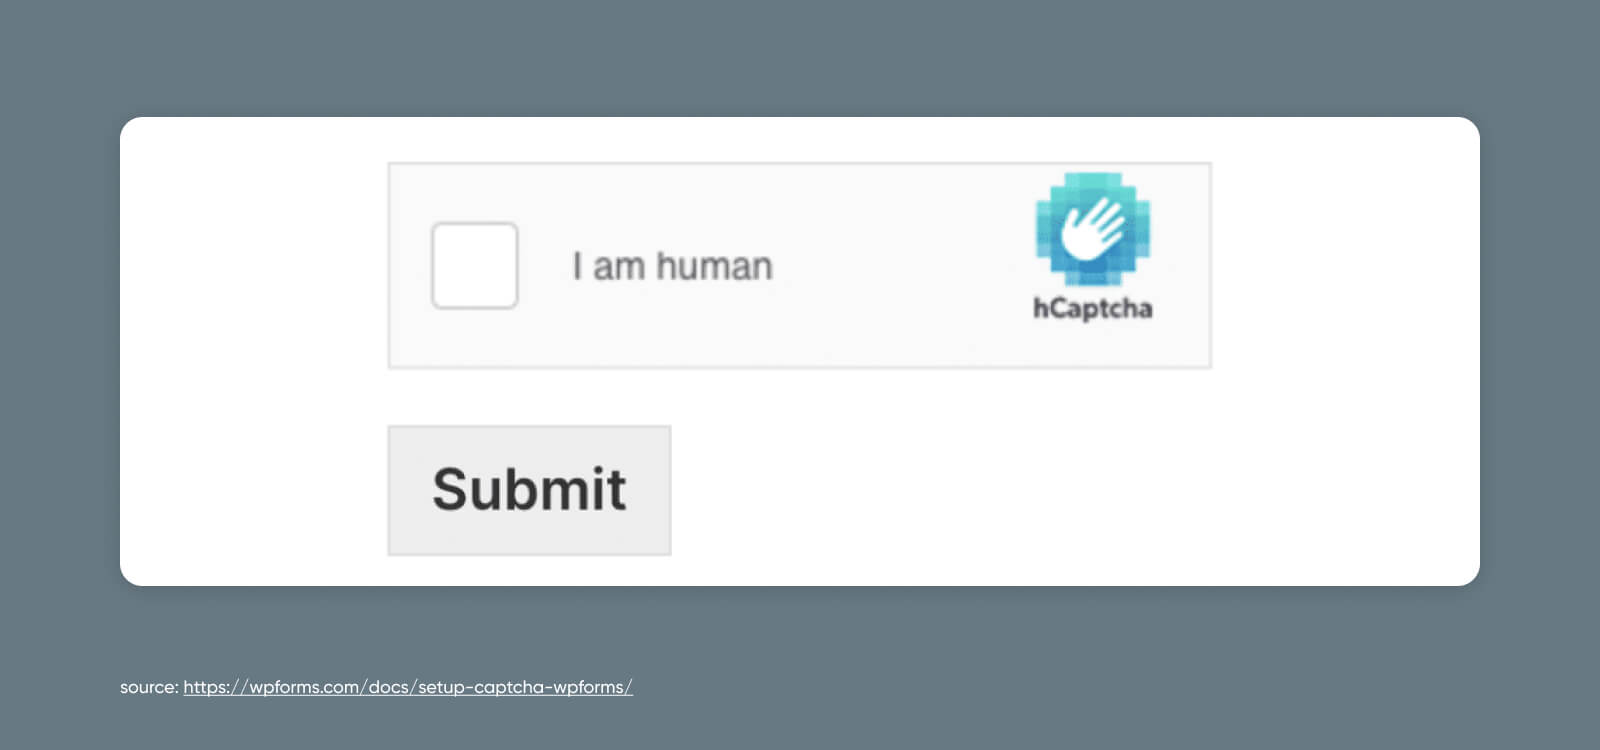
Checkbox-Based CAPTCHAs
While these CAPTCHAs may seem simple on the surface, they’re actually assessing how website users interact with the checkbox itself.
Bots fill out forms and complete checkboxes instantly, whereas humans navigate through this process more slowly.
This method may be combined with other CAPTCHAs if you want even more assurance that a user isn’t secretly a software program cleverly disguised as a human wearing sweatpants and drinking Starbucks.
Behavior-Based CAPTCHAs
The thing is, software has gotten so smart that a lot of the above CAPTCHAs can be bypassed these days.
That’s why the newest version of reCAPTCHA — Google’s reCAPTCHA v3 — changed the game with a CAPTCHA method that runs in the background.
reCAPTCHA v3 is a mostly invisible reCAPTCHA, which uses a JavaScript API and machine learning-powered, adaptive risk analysis engine to score users based on their behavior as they interact with your web pages.
Behind the scenes, reCAPTCHA v3 gives each user a score that attempts to determine whether they’re human or bot. Of course, in some cases, this monitoring may not be enough to stop the really intelligent bots.
In addition, in an age when the pendulum is swinging back toward privacy on the internet, this method can be controversial as it monitors your on-site activity, with the only warning often being the small reCAPTCHA badge.
What we’ve talked about here are just the most common CAPTCHAs. Other types of programs do things like ask the website user to drag objects to a specific point on the screen, play a “microgame,” and so on. Check out more CAPTCHA examples here.
Use Cases: Where to Apply CAPTCHAs to Prevent Spam
AI-powered automated software has a lot of extraordinary applications, such as helping businesses complete mundane, repetitive tasks to save workers time.
However, hostile actors have certainly found ways to use this technology to attack websites.
DDoS Attack
DDoS means Distributed Denial of Service. It’s an attack that tries to make a system or network unavailable by flooding it with traffic from multiple sources.
Read MoreHere are some of the best use cases, where applying CAPTCHAs can protect your site from spam and abuse.
Polls and Questionnaires
Businesses use polls and questionnaires for all kinds of reasons.
Externally, they can help you gather feedback and new ideas for products, services, marketing, branding, content, and everything else user-facing.
Internally, polls and questionnaires can help ensure employee happiness and collect insights on new policies and offerings.
You wouldn’t want to skew those results with an overwhelming number of automated, false responses, now would you?
Well, bots certainly might.
User Logins
Bots are often deployed to help hackers access websites through existing accounts that users have already set up.
Typically, they do this via brute force attacks that use software to automatically guess hundreds of passwords in seconds.
Why would they want to access these accounts? Sometimes it’s so they can steal information from accounts and use it to hack into other online properties. Hacking often happens in sequential events.
Other times, it’s so they can use the account to post promotional material or other information they know they’ll get quickly blocked for.
Comment Sections
You’ve probably seen plenty of spam popping up in comment sections across websites and social media.
Bots are used to leave comments en masse to spread advertising, a particular point of view (such as a political one around election time), or links to nefarious sources where hackers are waiting to steal visitor information.
Forms
Just like comment sections, forms that aren’t protected using CAPTCHAs can be overrun with false submissions from bots programmed to try to sell you something, spread a specific narrative, or even phish for sensitive data.
Checkouts
There are several reasons hackers would want to sic their bots on a website’s checkout page.
The first is obvious: buying out tickets or other inventory at a rate humans can’t keep up with. And then, probably, reselling them elsewhere for higher prices. (We’re not bitter about missing out on Taylor Swift tickets at all…)
Secondarily, bots can use unprotected checkout flows to do something called card testing. This is when they run automated scripts in your checkout system to test whether stolen credit card numbers are usable or not.
By requiring CAPTCHAs to be solved before the above actions are completed — your website should be able to identify and shut down most automated abuse carried out by bots.
Brute Force Attack
A brute-force attack is a cyber assault where the attacker uses trial-and-error to break into an online account. It is typically carried out by malicious bots that attempt to guess passwords, general login credentials, or digital keys.
Read MorePotential Downsides of Using CAPTCHAs
While CAPTCHAs clearly have their benefits, there are some downsides to consider when you’re setting up this system on your website:
- CAPTCHAs can make your website less accessible for people with hearing and/or vision impairment, or those who don’t know the language your CAPTCHA features.
- CAPTCHAs may interrupt the user experience, and if they’re too difficult, they may prevent engagement even from human users.
- CAPTCHAs are not completely foolproof, so website owners shouldn’t be lulled into a false sense of security — we still need to remain watchful for signs of spam and attacks.
In addition, there are some elements of Google’s reCAPTCHA in particular that website owners should know about:
- reCAPTCHA v3 can feel invasive to users because it monitors site-wide behavior in order to work, which may cause privacy-minded individuals to avoid using your site.
- Google’s business model is using or selling data for advertising, which can put off website owners (and users) who don’t want their behavior or data monetized.
- reCAPTCHA capitalizes on user labor by harvesting data from user interactions to train Google’s visual identification systems, with which some people may be uncomfortable.
- Google is sometimes blocked in countries such as China, so installing Google technology can severely limit a website’s global reach.
How to Add reCAPTCHA to WordPress via Plugin (6 Steps)
Preface: CAPTCHAs of all varieties can be added to websites of all kinds.
However, since WordPress is one of the most popular website platforms and reCAPTCHA from Google is powerful, free (up to a million assessments), and very popular — integrating these two is what we’re going to focus on today.
Now, let’s get to protecting your site.
Step 1: Register Your Site
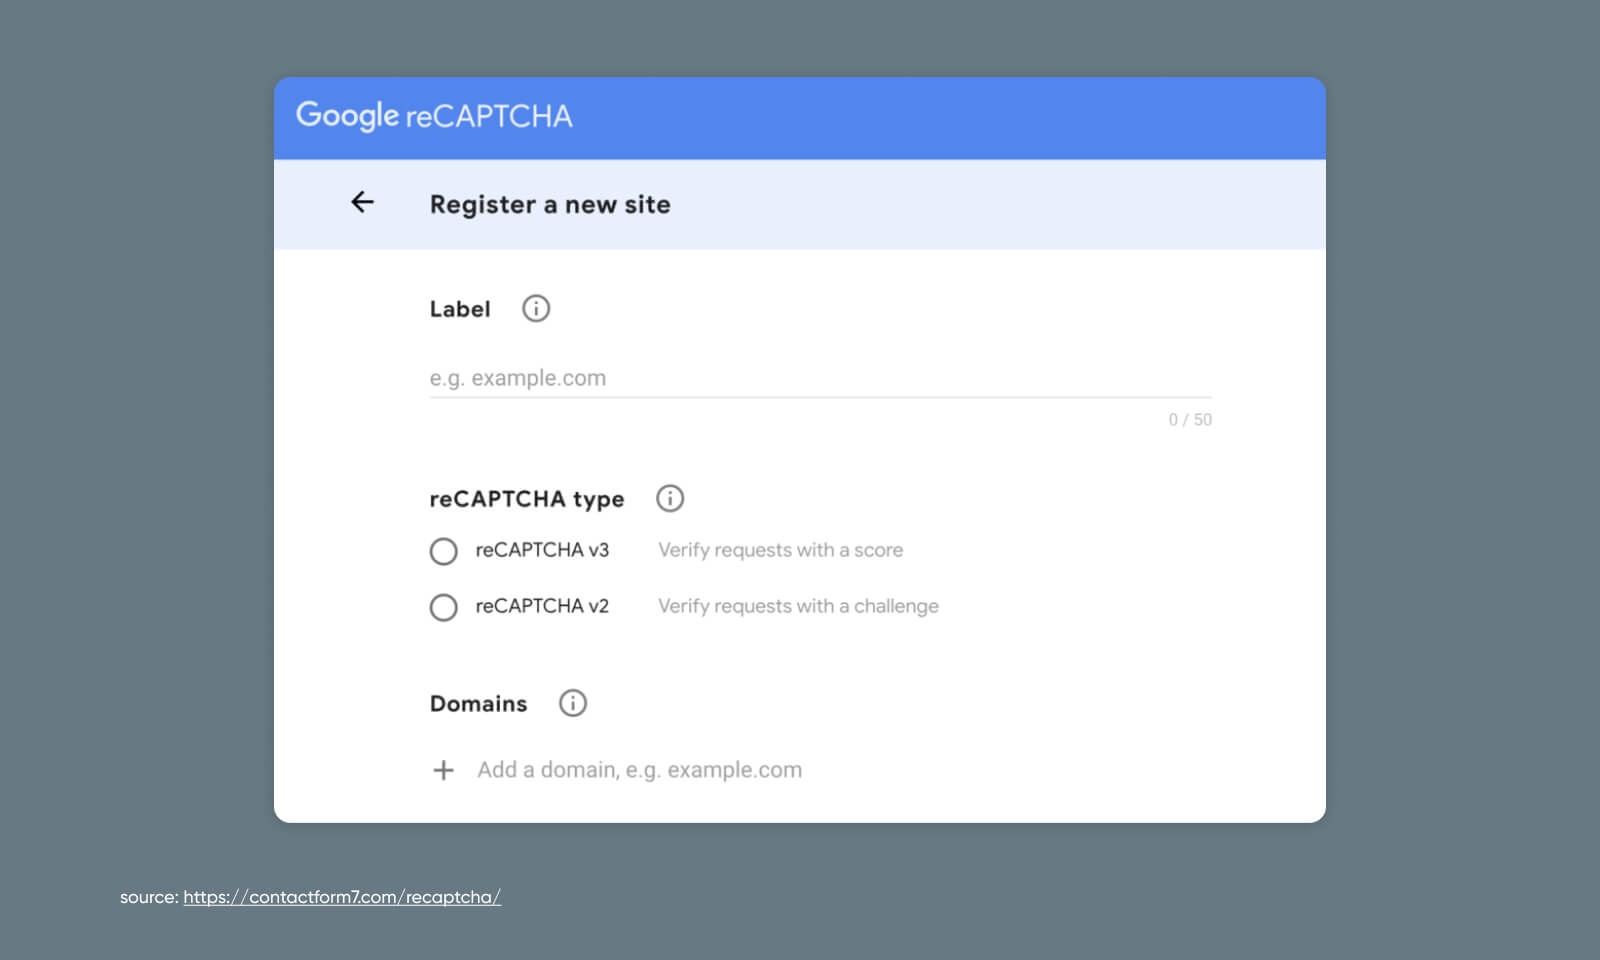
First things first, register your WordPress site in Google’s reCAPTCHA admin panel. To complete this step, you must sign into or create a Google account.
During registration, you’ll fill out information like what you want to call your website, which type of reCAPTCHA verification you want to use, etc.
Step 2: Grab Your Keys
With registration submitted, Google will provide both a site key, and a secret key. These are how you’ll get your Google reCAPTCHA to talk to your WordPress website.
Copy them, because we’re going to put them to use soon.
Step 3: Install WordPress Plugin
Now, log into WordPress.
If you don’t already have a reCAPTCHA plugin installed, head to Dashboard > Plugins > Add New and search for “reCAPTCHA.” reCaptcha by BestWebSoft, CAPTCHA 4WP, and Contact Form 7 are all popular options.
Once installed, most of these plugins will walk you through connecting your website to your Google reCAPTCHA. We’ll carry on the rest of this tutorial using Contact Form 7 as an example of how approachable it can be.
Step 4: Turn on reCAPTCHA
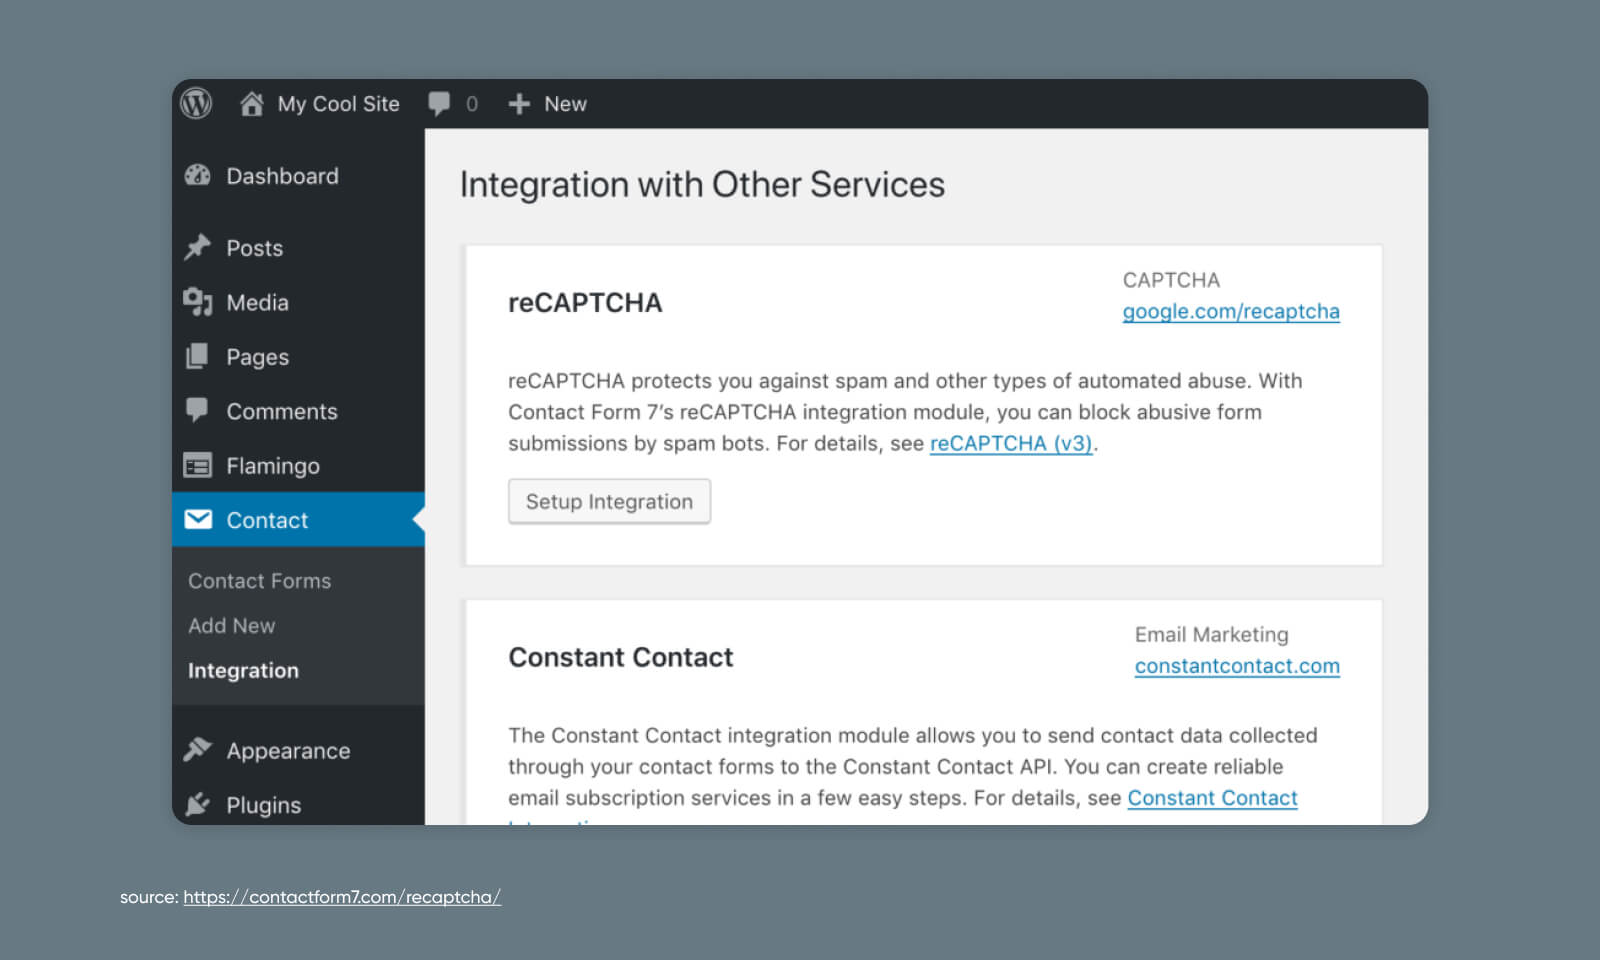
With Contact Form 7 installed, head to Contact > Integration in WordPress. Locate the reCAPTCHA integration box and begin the setup process.
You will be asked to paste in the site and secret keys you just got from Google. Once those are added and changes saved, reCAPTCHA will be up and running on your site.
For a walkthrough of setting up Contact Form 7, check out our Knowledge Base article on Troubleshooting WordPress contact forms.
Step 5: Add reCAPTCHA to a Form
Now that your reCAPTCHA functionality is turned on, you’ll need to add it to any forms you want to protect from bot submissions.
To do so, go to Contact > Dashboard in WordPress and add a new form.
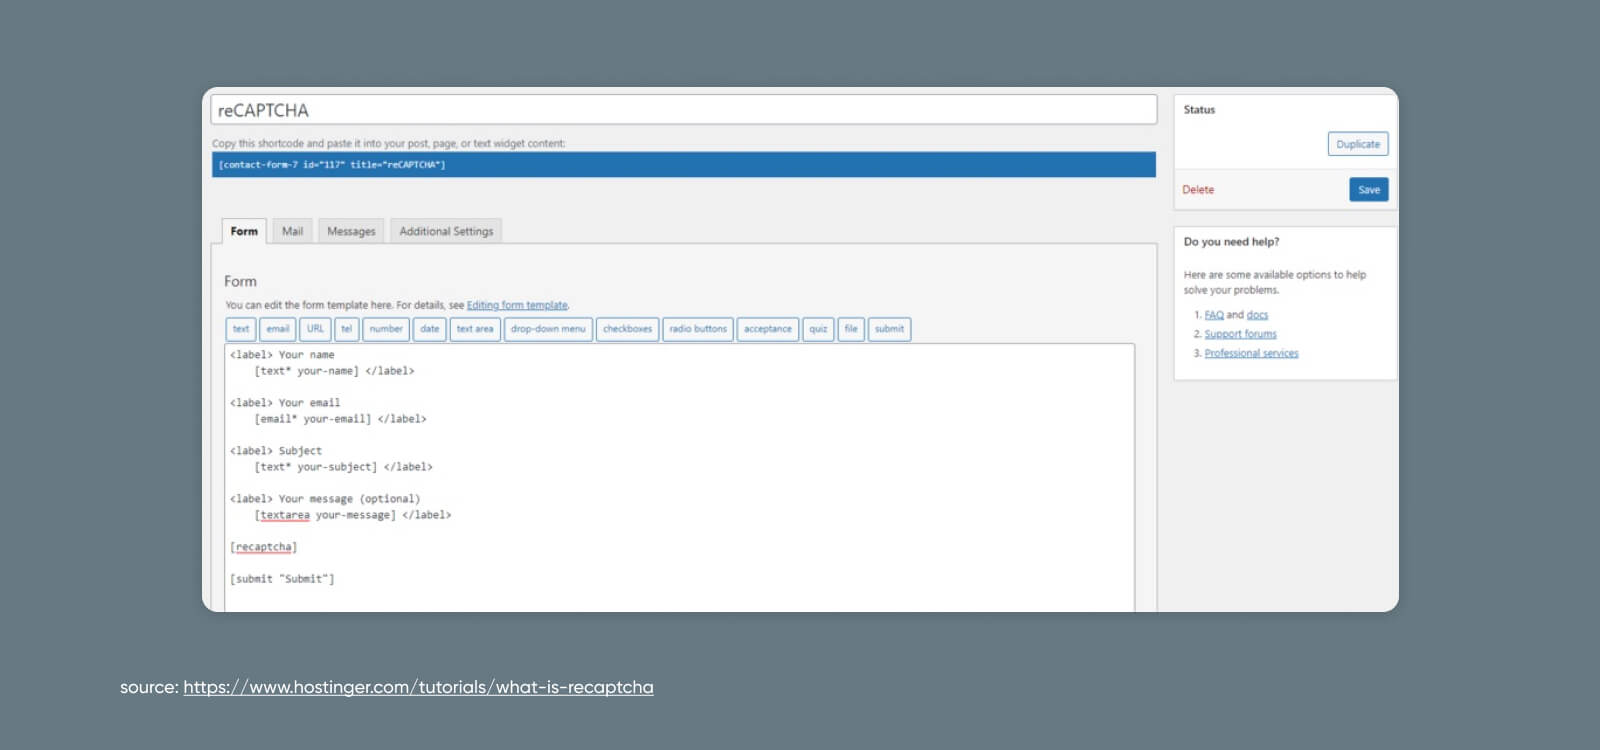
Here, you’re going to lightly edit the code of the form template to inject a reCAPTCHA.
Add “[recaptcha]” right before the “[submit “Submit”]” line. Once you save, you should see a shortcode appear under the form title.
Step 6: Publish Your reCAPTCHA Form to Your Website
Copy that shortcode you just created.
Now, go forth and paste that code into posts, pages, or text widgets to install a new form complete with a reCAPTCHA!
How to Add reCAPTCHA to WordPress Manually (4 Steps)
As an alternative to the plugin route, you can add a reCAPTCHA manually to any form on your website.
This will take a bit of code tinkering. If you’re squeamish with things like head tags and JavaScript snippets, then you may feel most comfortable sticking with an out-of-the-box option.
But if you’re ready to roll up your sleeves, getting things set up is pretty easy on a scale from super easy (launching a new website with DreamHost) to super difficult (solving the three-body problem).
Let’s get into it.
Step 1: Register Your Site and Grab Your Keys
Just like with the plugin route, you’ll need to start by signing up for reCAPTCHA from the Google website.
You can do that in two quick steps:
- Register your WordPress site in Google’s reCAPTCHA admin panel and select the reCAPTCHA type.
- Copy both your site key and secret key for future use.
Now, let’s get back to the website at hand. There are three core pieces that make reCAPTCHA work:
- The JavaScript library (reCAPTCHA API)
- The HTML form element
- The response verification code
We’ll kick things off with the reCAPTCHA JavaScript library.
Step 2: Add the reCAPTCHA JavaScript Library
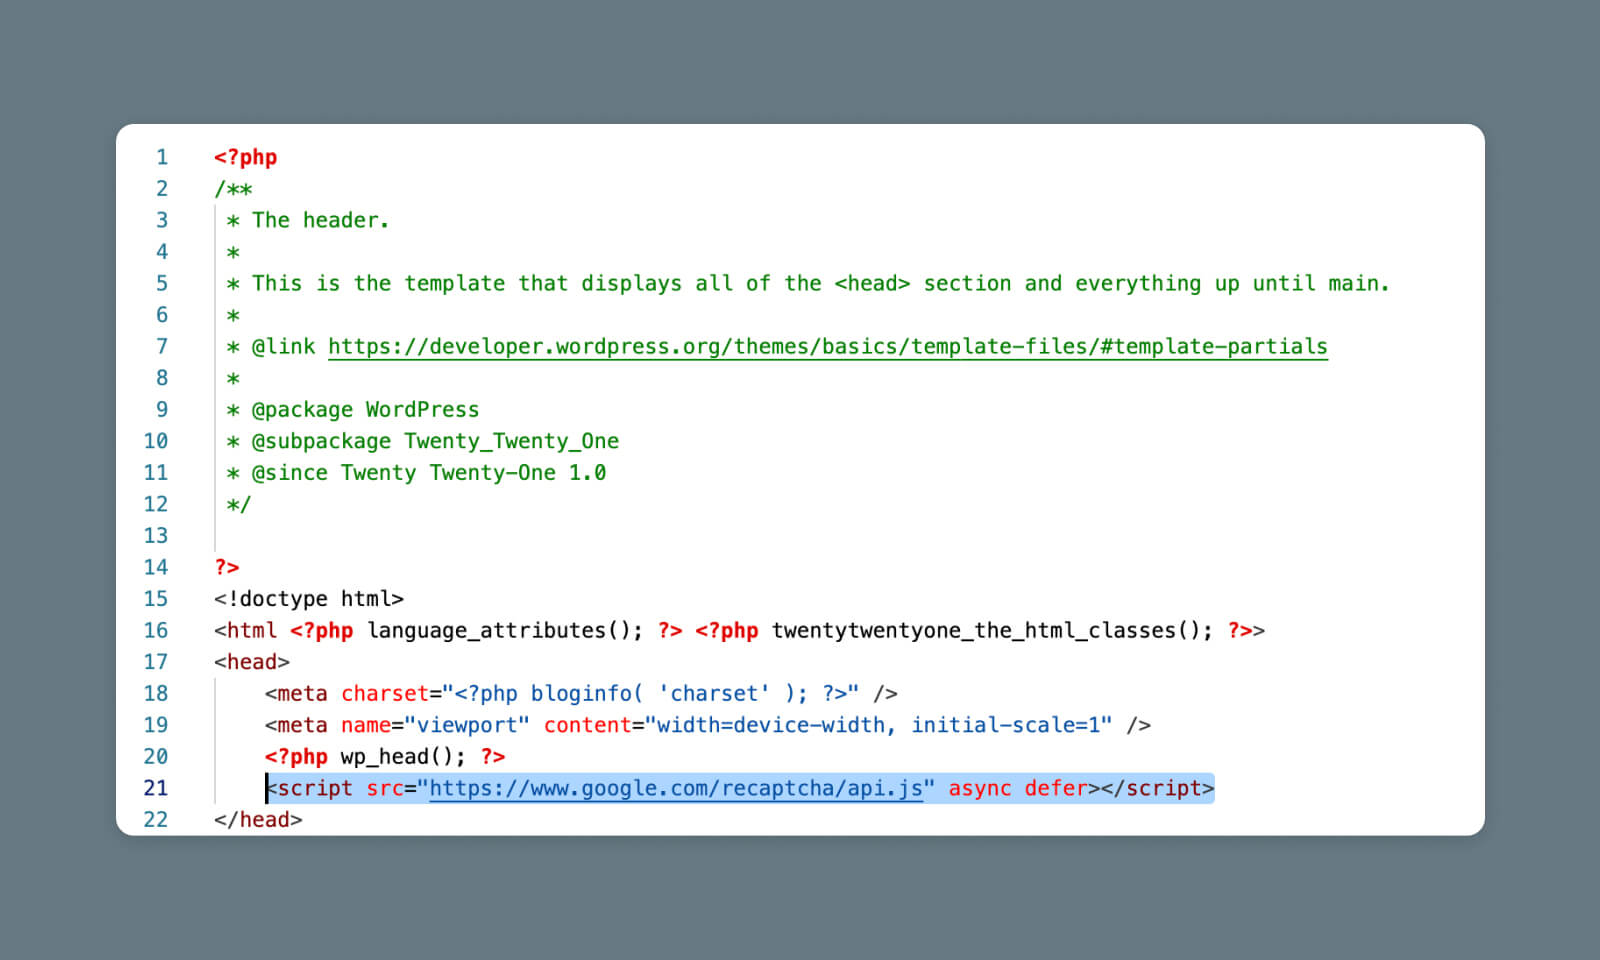
To get started, we need to add the JavaScript library to your website. This is a small snippet of code that needs to be added to every page that will use reCAPTCHA:
“<script src="https://www.google.com/recaptcha/api.js" async defer></script>”
The easiest way to make sure this is accessible on all of the necessary pages is to add it to your universal header before the closing “</head>” tag.
You can do this one of two ways:
- Manually, by accessing the header.php directly within the WordPress admin, or the file manager inside your hosting dashboard
- By using a plugin to add the code to your header
Adding the Code Manually
If you choose the first route, you’ll need to use either the theme file editor inside WordPress or your file manager to access the header.php directly.
Important Note: Editing your theme files directly could break your website, and your changes could be overwritten whenever you update your theme. If you’re not experienced with editing the theme files directly, skip ahead to “Using a Plugin to Add the Code” for a less risky solution.
Your file manager will look different depending on your host, but if you’re using DreamHost, navigate to WordPress > Managed WordPress in the sidebar. Find the domain to which you want to add a reCAPTCHA and select Manage.
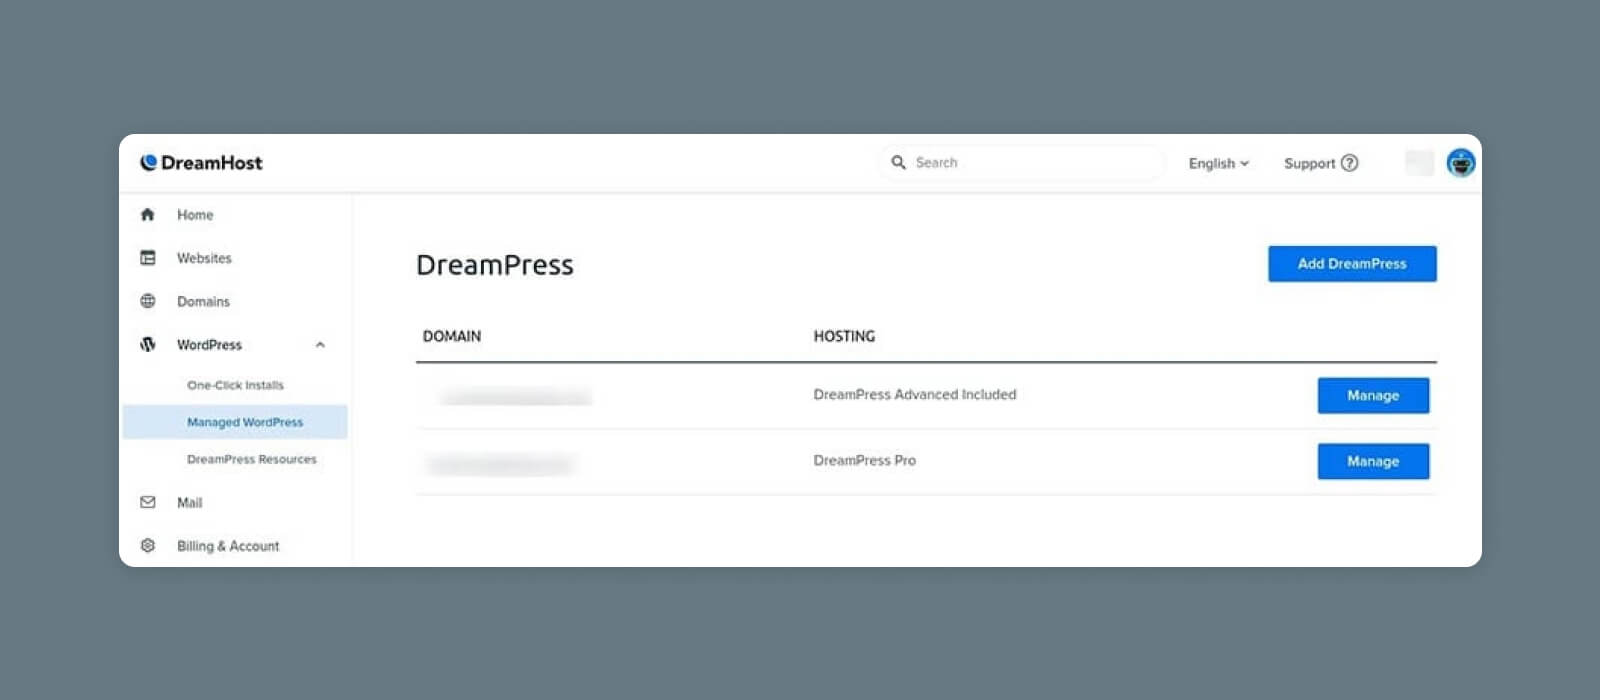
Then, click on the Manage Files button in the Details section.
Open the folder that has your domain name on it. From there, you’ll navigate to wp-content > themes and find the folder for your current WordPress theme.
Find the file called header.php, open it up, and find the closing <code>“</head>”</code> tag within the code.
Copy and paste the reCAPTCHA JavaScript snippet right before that line.
Using a Plugin to Add the Code
If the above seems like too much, don’t worry. We’ve got you covered.
Instead, you can install a WordPress plugin that will automatically add code directly to your header with no hacking required.
Using a plugin like WPCode, you can easily add relevant code snippets to key parts of your WordPress theme.
From your WordPress admin panel, go to Plugins > Add New and search for WPCode.
Click Install, then Activate.
Once WPCode is activated, you should see a new section in your left-side menu called Code Snippets.
Go to Code Snippets > Header & Footer.
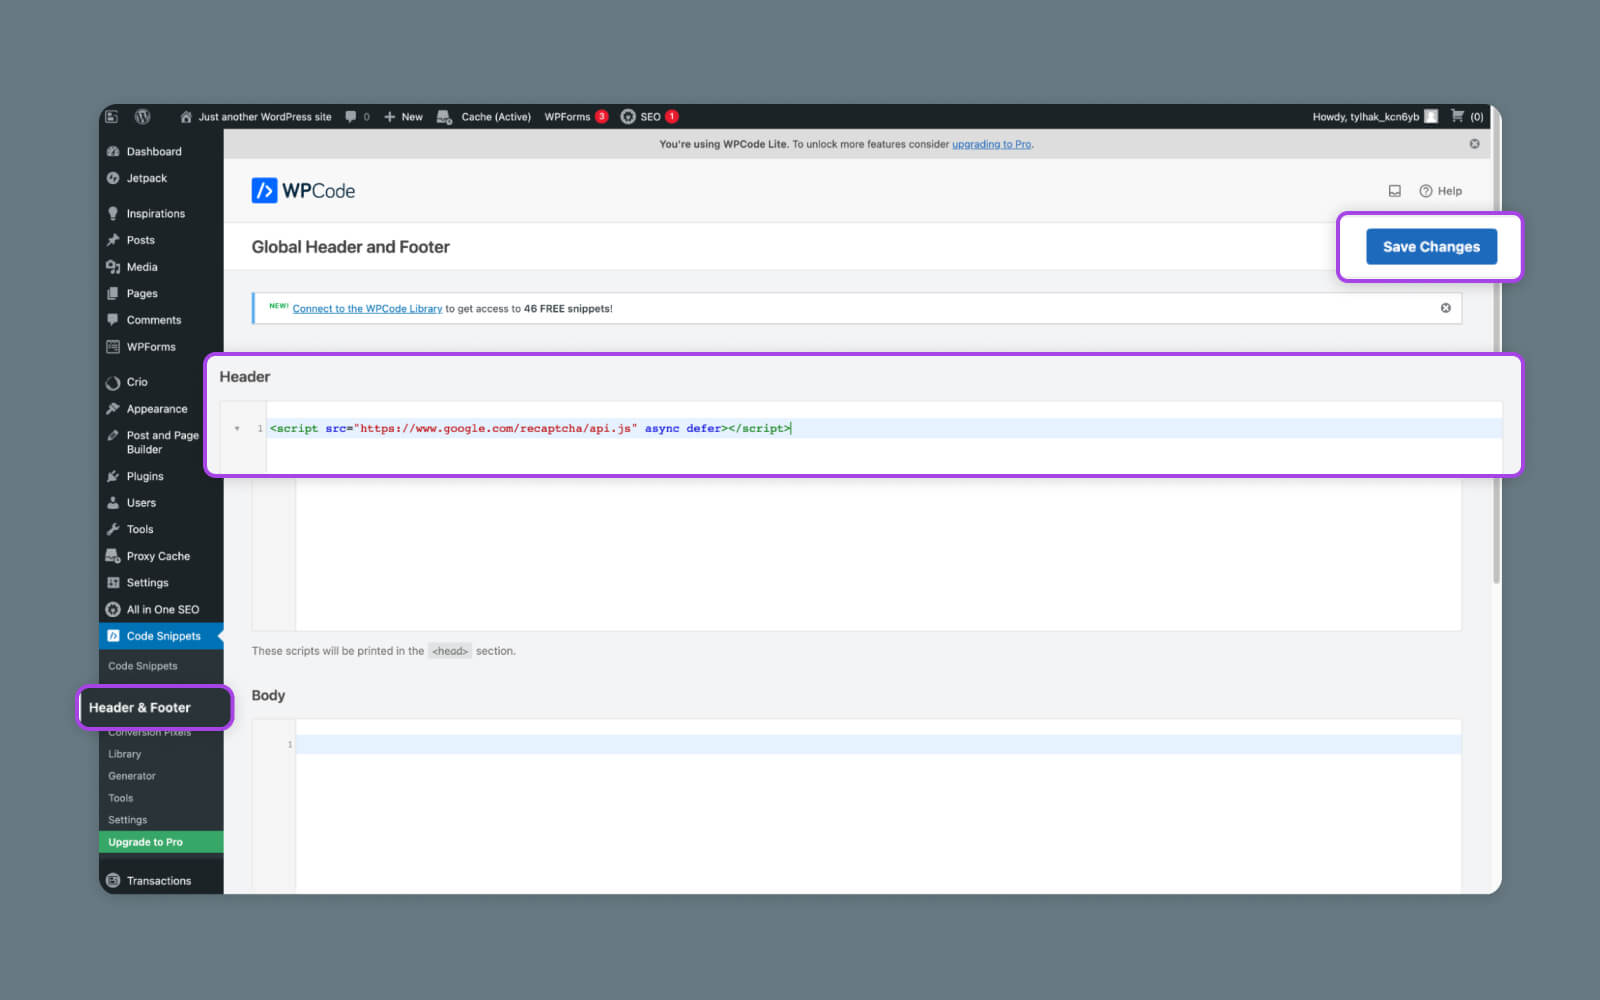
Inside the Header & Footer page, paste the JavaScript code into the Header section and save your changes.
Boom — code added!
Step 3: Add reCAPTCHA to Your Form
Now, we’re going to adjust the code on the actual form where you want to see your reCAPTCHA.
Again, you can use a file manager, the WordPress editor, or even FTP. It should live inside the wp-content folder, which houses all your plugins, themes, and media.
In the form code, paste the following code before the submit line to add the reCAPTCHA:
“<div class="g-recaptcha" data-sitekey="your_site_key"></div>”
Here’s an example of how it might look:
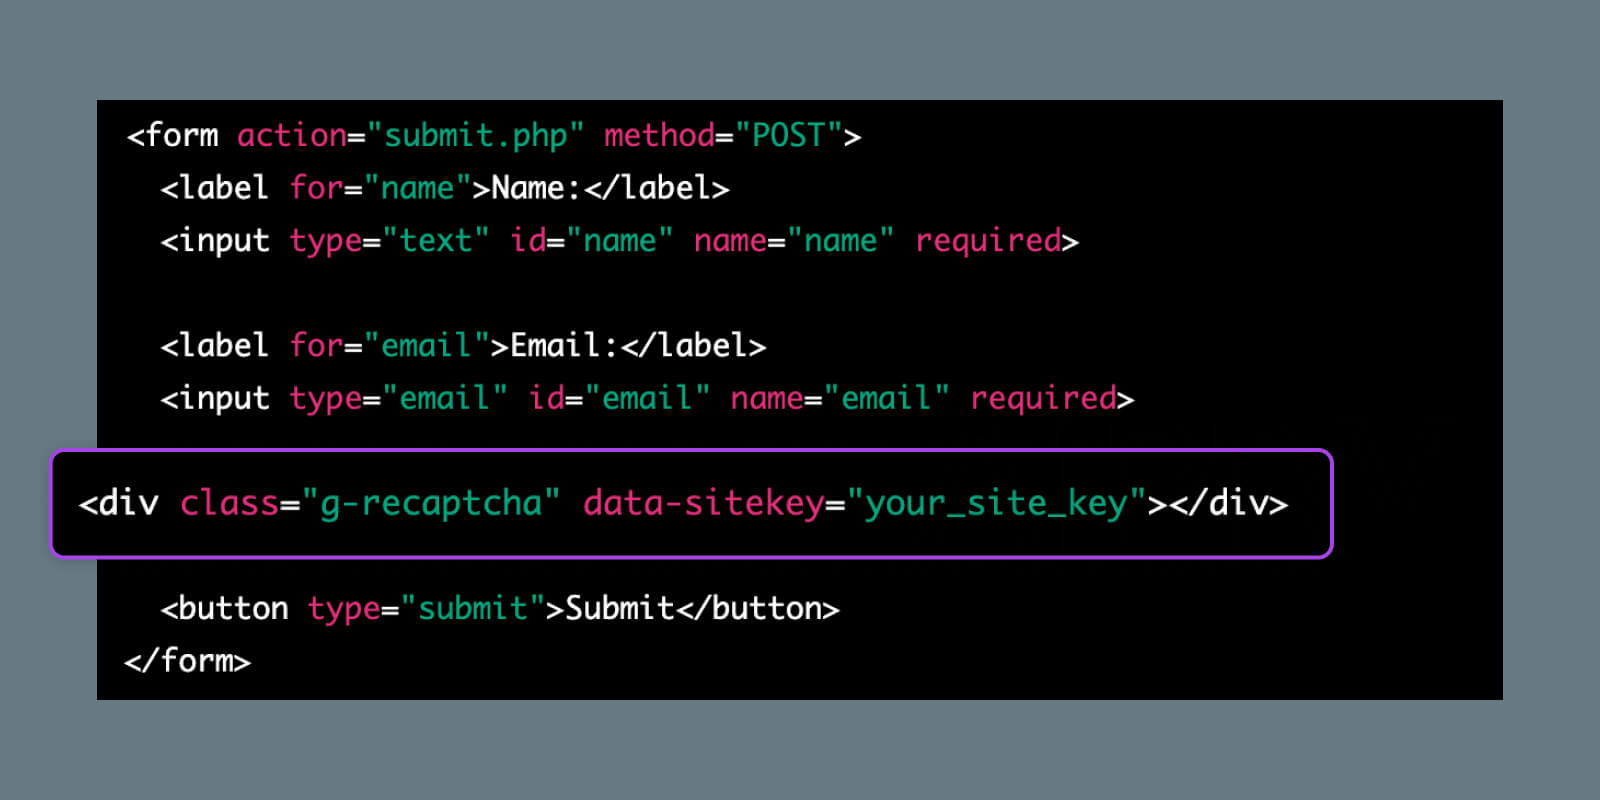
Replace “your_site_key” with the site key you received from Google.
Step 4: Handle the Response
Perhaps the trickiest part of the process is adding code to handle the response from reCAPTCHA. This basically tells your site whether to process the form or block it.
To configure this, you’ll need to add another snippet of code to the form (the callback function):
$secretKey = "your_secret_key";
$response = $_POST['g-recaptcha-response'];
$remoteIp = $_SERVER['REMOTE_ADDR'];

$url = "https://www.google.com/recaptcha/api/siteverify?secret=".$secretKey."&response=".$response."&remoteip=".$remoteIp;
$response = file_get_contents($url);
$responseKeys = json_decode($response,true);

if(intval($responseKeys["success"]) !== 1) {
    // Handle reCAPTCHA validation failure
} else {
    // Process form submission
}”
In this code, you’d need to replace “your_secret_key” with the secret key provided by Google.
This is just one example of an implementation that would allow you to customize how the submission is handled. There are many other methods for handling the server-side validation and callback functions.
For more info on how to handle this part of the process, refer to the official documentation from Google.
Goodbye Spam, Hello Security
While we must reiterate that reCAPTCHA and CAPTCHAs are not the be-all and end-all when it comes to website security, they’re a crucial step in helping you fend off automated bots and hackers with ill intent.
For more tips on securing your WordPress website and beyond, stay tuned to the DreamHost blog. We’re always posting resources to help you keep your website safe, fast, and online so you can impress site visitors and search engines alike.
You Dream It, We Code It
Tap into 20+ years of coding expertise when you opt for our Web Development service. Just let us know what you want for your site — we take it from there.